OpenBSD
Router OpenBSD
Router

Although this
is a FreeBSD website, I like OpenBSD
too. As I developed a floppy router based on OpenBSD
4.1 (and now also OpenBSD 5.1), I'd like to share some information
about it.
NOW MAHESHAOPENBSD
LIVE USB - TURNKEY WORDPRESS/FTP SERVER (OpenBSD 5.2)
IS AVAILABLE

SONaFR
- Simple OpenBSD
NAT and
Firewall/Router
See also KarmaBSD
SONaFR is a small system with router/NAT/firewalling capabilities
that fits onto a single floppy/small USB flash card.
SONaFR-1.0, Copyright (c) Juraj Sipos, October 2007
SONaFR-2.0, Copyright (c) Juraj Sipos, July 2012

Download SONaFR-1.0 here.
Download SONaFR-2.0 here
Contact
Linux is a cult
The NEWS!!! SONaFR-2.0 is now available
SONaFR-2.0 (USB/CD)
NOW MAHESHAOPENBSD
LIVE USB - TURNKEY WORDPRESS/FTP SERVER (OpenBSD 5.2) IS AVAILABLE

To learn more about my projects, click
here.
In July 2012, I made SONaFR-2.0 - two USB images, one has 64 MB and
the other one has 1 GB. Both images are in the ZIP file that you may
download here. A lot
of information pertaining to SONaFR-1.0 is usable also for SONaFR-2.0,
but I will nevertheless write something about the new version, at least
the most important things. SONaFR-2.0 has DHCP server in it working
with the range of 192.168.13.10-192.168.13.255 addresses. To use this
router, setup the gateway for 192.168.13.11. DHCP server in SONaFR uses
OpenDNS public servers (208.67.222.222); you may change this any time
in /etc/dhcpd.conf.

You may observe some error messages upon your
first contact with SONaFR-2.0, but do not worry about these. This is
because of my default /etc/hostname.fxp0 and other settings that will
be different on your system. It is easy to change these settings to
your own liking, so do so and reboot.
SONaFR-2.0 has also Midnight Commander, Lynx and a simple
text editor (mg), although you may edit files in Midnight Commander
(type 'mc' in the shell). You can make a bootable ISO image in the /mnt4
dir immediately by running the noninteractive /makeiso script, but do
mount a partition into this dir first. I tested the ISO image both in
Qemu and on a CD.

You may copy the full OpenBSD 5.1 system from your hard drive into
this thing (into the 1 GB-sized USB flash drive), but do not delete
the /mfs dir, /etc/rc.local and /etc/fstab. If
you delete the above files, you will still have them in the /mfs dir.
You may turn off your computer anytime when working with this thing,
as it is mounted read-only.
SONaFR download
on File Fishstick
If the router does not work, reconnect cables and rerun 'dhclient your_nic'
every time after you make a correction if something went wrong (for
example, if you used the 'pfctl -f /etc/pf.conf' command with incorrect
settings).

The kernel in this thing supports everything like the original OpenBSD
kernel, so expect to have the same usability with this thing as with
the full OpenBSD system.
You may edit the /etc dir anytime, but please run the /mfs/makeetc
script each time after you make changes in your /etc dir, as /mfs/etc.tgz
is copied into memory upon every boot. A good advice is to create the
/etc/hostname.xx0 file and replace 'xx0' with the real network interface
card on your system; to do this, remount SONaFR for read-write access
('mount /dev/sd0a /'), edit your /etc dir (pf.conf, etc.), then run
the /mfs/makeetc script, then remount SONaFR back for read-only access
('mount -o ro /dev/sd0a /').If /etc/hostname.vr0 is the card connected
to the Internet on your system, all you need to do is to put the string
'dhcp' in it and reboot.
SONaFR-1.0
My one floppy projects are all
available in one multiboot ISO image, which can
be downloaded here (I thank www.rootbsd.net
for giving me some space on their servers).
The diskette image is in the Zip format; it must be unpacked and written
to a floppy using this command (FreeBSD, Linux = /dev/fd0; OpenBSD =
/dev/fd0a):
dd if=sonafr10.img of=/dev/fd0a
or you can use the rawrite.exe utility, which can be found on
many Unix sites; it is also included in the 1FCDBSD
package (One Floppy CD Audio and MP3 Player). You can also use many
utilities such as Winimage.
As I found some incompatibilities between
DOS, Windows 98 and Windows XP, I included rawwritewin.exe
in the ZIP package, so you can then breathe with ease - see the picture
below.
 SONaFR SONaFR
OpenBSD has a unique packet filter (firewall) capability
and this system is considered to be one of the best security solutions
around.
Automation restricts - I have already experienced this many times -
a cellular phone that switches off its backlight right at the moment
when you need to read a phone number from its screen, or even a VHS
recorder that switches off after only five minutes of recording, without
notifying me about it. The fact that you must hold a button for a few
seconds in order to record the entire film is explained somewhere in
the huge manual - which most of us do not have time to read.
SONaFR is a floppy distro
with minimal kernel. Under such conditions not all drivers are compiled
in the kernel.
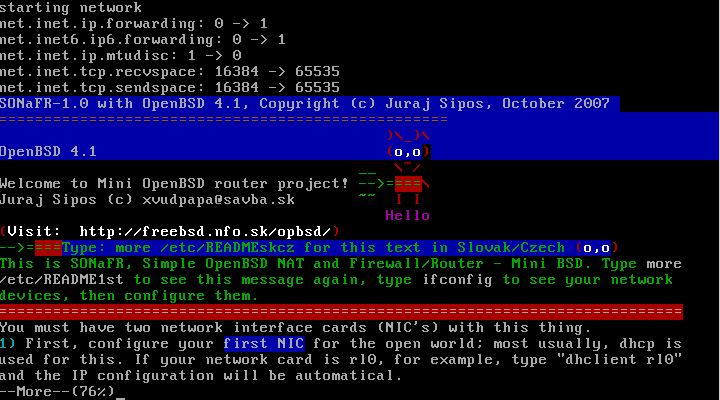
You must have two network interface cards (NIC's) on the
computer where you want to use this floppy. To see all network interfaces
available on your system, type: ifconfig (from within SONaFR);
type: more etc/cards to see all cards that the SONaFR's kernel
supports.
 How
to configure SONaFR How
to configure SONaFR
No installation is necessary - SONaFR is a bootable diskette with OpenBSD
4.1, it has its own little editor (mg) and an editable filesystem stored
in memory. Minimal requirements are at least 9,5 MB of RAM
and a working computer (Pentium, or even 486) with a diskette drive.
All other factors depend on SONaFR's ability to detect your network
interface cards (NIC's). This ability is good, but since the kernel
is minimalist, some network cards may not be recognized. Once the floppy
boots, you will find a navigation text whereby you press SPACE to read
the introduction text up to the end. See the picture below.
The QuickStart Way
1) configure your network cards using ifconfig
2) edit the file /etc/pf.conf (specify the real NIC's on your
system here)
3) specify your DNS servers - edit /etc/resolv.conf
4) activate your Internet connection, e.g., use (type) the command
"dhclient rl0"
5) finally, activate the firewall itself - either type "/etc/start2",
or
activate the firewall manually (these commands
are included in the start2 script):
pfctl
-F all
pfctl -f /etc/pf.conf
pfctl -s state
6) configure your computers on LAN (Local Area
Network) - the ones that you plan to connect to this router, and specify
the gateway address in all of them too (192.168.0.1), as well as IP
addresses of the actual DNS server.
A More Detailed Description
First, configure the external NIC
which will be connected to the outside world; most usually, dhcp
is used for this. If your network card is rl0, for example, type
"dhclient rl0", whereby the connection is made automatically.
Ping the outside world to test if the connection is working: "ping
217.67.16.49", which is the same as "ping www.freebsd.nfo.sk".
But to resolve names, you need your nameservers (see section 4 below)
to do the job. However, pinging sites - IP addresses in the number format
should work.

After typing "ifconfig", you will see a similar screen as
above.
Configure your internal NIC (not
for the outside world, but used for computers on your LAN); if your
internal NIC is nfe0, type "ifconfig nfe0 192.168.0.1"
(if it is not "nfe0", then replace "nfe0" with your
system's real network interface). The private address (192.168.0.1)
must also be put into /etc/pf.conf for NAT. If you receive an
error message after typing "ifconfig interface address", it
is most likely that the driver for a network card is not compiled into
the kernel.
If both (external and internal) NIC's are configured, edit /etc/pf.conf
and put the proper device name for "IntIf" (Internal
Interface) and "ExtIf" (External Interface) just below
the commented text "Declare Interfaces" in the beginning of
/etc/pf.conf. Use "mg" to edit files - type:
"mg /etc/pf.conf"; change also the first command at
the beginning of pf.conf: "set logininterface", and
put your real External Interface there (rl0, nfe0, dc0, etc.) like this:
"set logininterface rl0". After you are finished with
editing, exit mg with Ctrl+X+C and press "y"
to save your changes.
An example of the beginning lines of the /etc/pf.conf file is here
and you only need to change text in red color:
----------------> example of /etc.pf.conf <-----------------
# $OpenBSD: pf.conf,v 1.28 2004/04/29 21:03:09 frantzen Exp $
#
# See pf.conf(5) and /usr/share/pf for syntax and examples.
# Remember to set net.inet.ip.forwarding=1 and/or net.inet6.ip6.forwarding=1
# in /etc/sysctl.conf if packets are to be forwarded between interfaces.
set loginterface
rl0
# Optimize the engine for normal network environment.
# Section: SCRUB
# Interface: all
# Resolve overlapping IP fragments. Fragments are cached and reassembled
by
# pf before a packet is received by its destinations. This will protect
# machines with less secure stacks behind it from fragmentation attacks.
# -------------------------------------------------------------------------
#scrub in all
scrub in all fragment reassemble
scrub out all
# -----------------------------------------------------------------------
# Declare interfaces
# -----------------------------------------------------------------------
LoIf="lo0"
IntIf="nfe0"
ExtIf="rl0"
==========================================================================
----------------> end of example of /etc/pf.conf <-----------------
Then edit /etc/resolv.conf (type: mg /etc/resolv.conf)
and put your real DNS servers there. Type /etc/start2, or look
into the file /etc/start (with the "more" command -
"more /etc/start") to see some commented examples in
case you need to change the MAC address of your external NIC if your
Internet provider requires MAC identification.
Every PC behind NAT needs its own unique internal IP address; conflict
of addresses may cause problems. Connect your desktop computer(s) to
this router (to its Internal Interface via a hub), configure your desktop's
NIC for the range of 192.168.0.? addresses (e.g., 192.168.0.3, 192.168.0.4,
etc.) and issue this command on it: "route add default gw 192.168.0.1"
(Linux) or "route add default
192.168.0.1" (FreeBSD).
This way you tell your desktop computers (Linux, FreeBSD, etc.) to use
the default gateway, which is SONaFR in our case. If you use Windows,
configure the network similarly (for the range of 192.168.0.? addresses;
but omit please 192.168.0.1, which is our router - gateway) and specify
the gateway address (192.168.0.1) of SONaFR on every Windows PC. In
case you have more computers, you can connect this router's Internal
Interface to a hub.
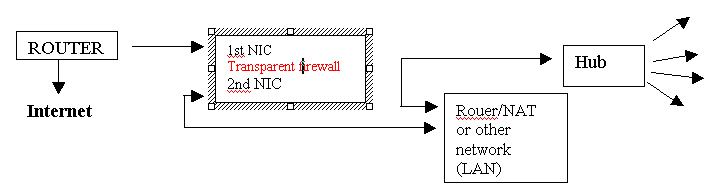
Transparent Firewall
This thing may also be used as a transparent firewall (invisible firewall).
If you have a computer with two NIC's and you move data from one network
card to another one via a bridge and without IP addresses, you work
on the OSI layer 2 model (data link); thus, you will get a full
firewall which you can put anywhere on any network segment without needing
to configure or change anything on the existing network. Such a firewall
is very quick, as no decisions are made with respect to IP addresses.
Type: "ifconfig bridge0 create"
Then type: "brconfig bridge0 add rl0 add rl2 up" to
activate the bridge, i.e. to move data from one NIC to another one (transparent
firewall) and replace "rl0" and "rl2" with network
devices present on your actual system. To activate the transparent firewall,
you have to run the pfctl command too:
pfctl -f /etc/pf.conf
The behavior of such a firewall depends on the rules defined in the
/etc/pf.conf file.
Bandwidth Control
OpenBSD Packet Filter has an advanced feature for controlling the volume
of bandwidth - extent of data passed via network, which is called traffic
shaping. ALTQ statements are used for this, which you write as commands
to your /etc/pf.conf file. There are some manual pages on the Internet;
however, it is not my goal to provide a detailed information on various
advanced features of Packet Filtering - this is strictly an OpenBSD
issue.
Tips:
This is a simple but quite efficient one floppy firewall and NAT/router
(tested on a few computers); editing, improving, or customizing your
/etc/pf.conf will change rules how this firewall behaves.
Type: /etc/floppy to format a (preformatted) diskette; or to
backup or restore configurations.
Type: /etc/memory to find out the size of your available (free)
RAM.
Type: more /etc/RAM-examples to see how to reconfigure RAM.
Type: more /etc/license to see the license.
Type: more /etc/cards to see the network cards (NIC's) this mini
BSD supports.
Type: more /etc/allcommands to see all commands this router supports.
Enjoy!
|